


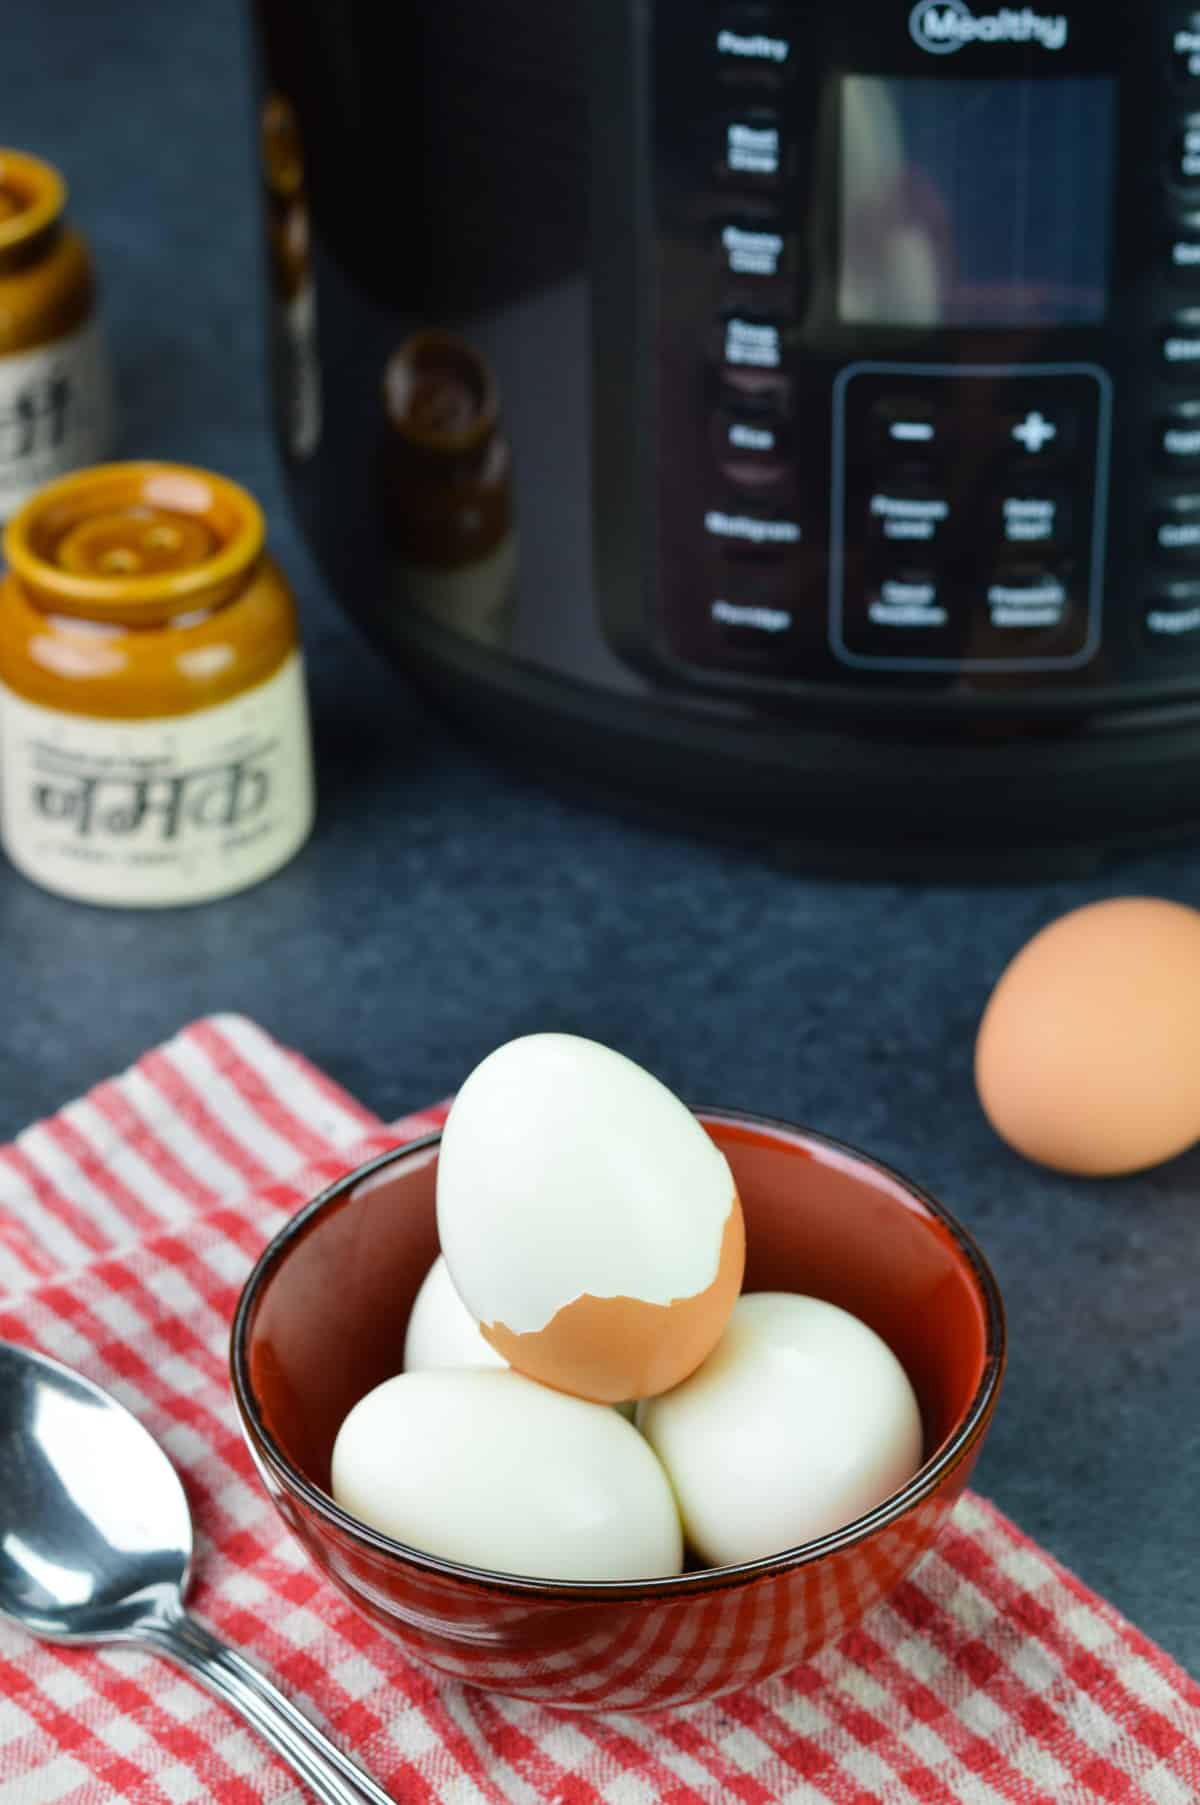
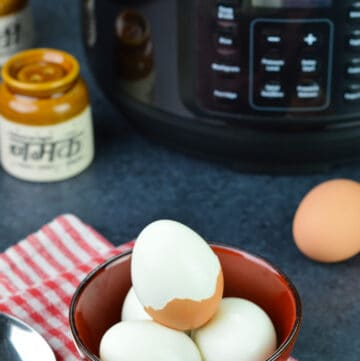
If you haven't tried making hard boiled eggs in the Mealthy Multipot, then you're missing out! Because Mealthy Multipot hard boiled eggs are simply the BEST.
Actually it's the electric pressure cookers - they are a godsend for boiling eggs, among many many other amazing things they can do. Because I've also managed to get perfect hard boiled eggs every single time using my Instant Pot.
So if you want consistently perfect, easy peel hard boiled eggs, every single time, without that blue / black ring around the yolk, then use an electric pressure cooker like the Multipot or the Instant Pot to make them. And trust me, you'd never want to hard boil eggs any other way!
These Pressure Cooker Hard Boiled Eggs
- turn out consistently perfect
- have well cooked bright yellow yolk
- with no black/blue ring around yolk
- and are super easy to peel!
How to Make Hard Boiled Eggs in Mealthy Multipot
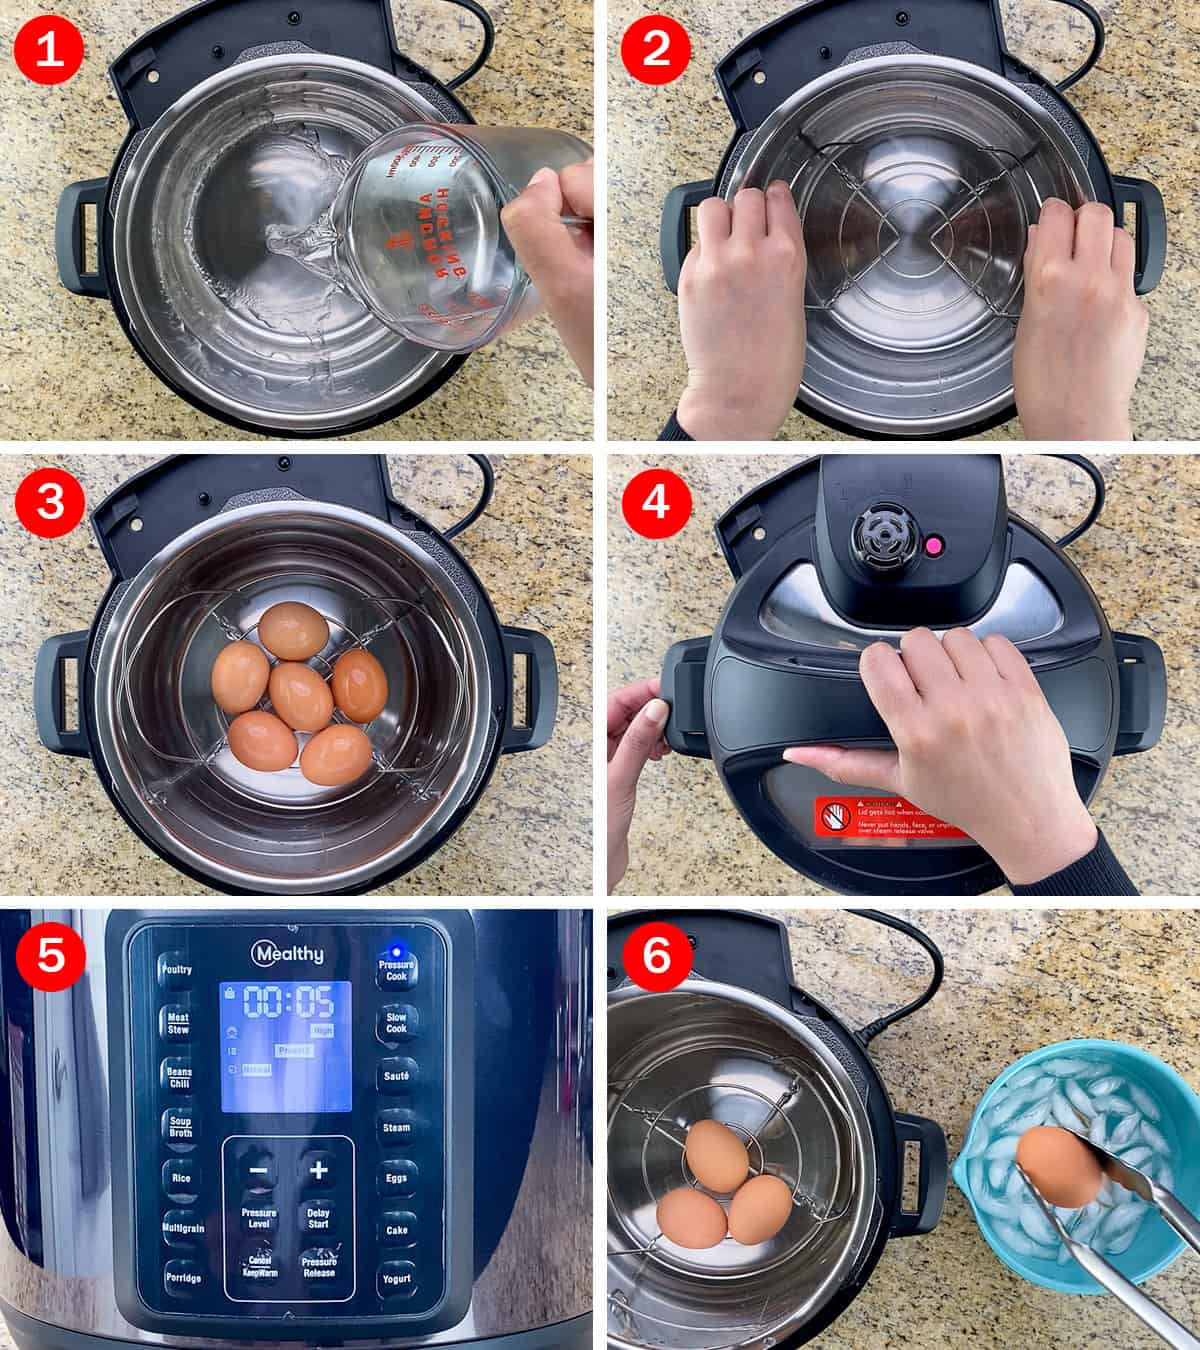
- Plug in the Multipot, and pour 1.5 cups of water in the inner pot. And it's best to use really cold water for this, as the temperature of water determines how much time the Multipot takes to come to pressure, which in this case, means a few minutes of additional cooking time.
- Then place the trivet in the pot, and the eggs on the trivet.
- I have used 6 eggs, but you can follow the same exact method / timings, and use the same quantity of water for boiling anywhere from 4-12 eggs. If you need more than 12 eggs, it's best to start a new batch.
- Also, I have simply placed the eggs side by side on the trivet, but if you are using a larger quantity of eggs, you can stack them, one above the other, and that'll be fine. Alternatively, you can use a pressure cooker egg stacker like this one.
- Once the eggs are in, close the Multipot lid, and ensure it's sealed.
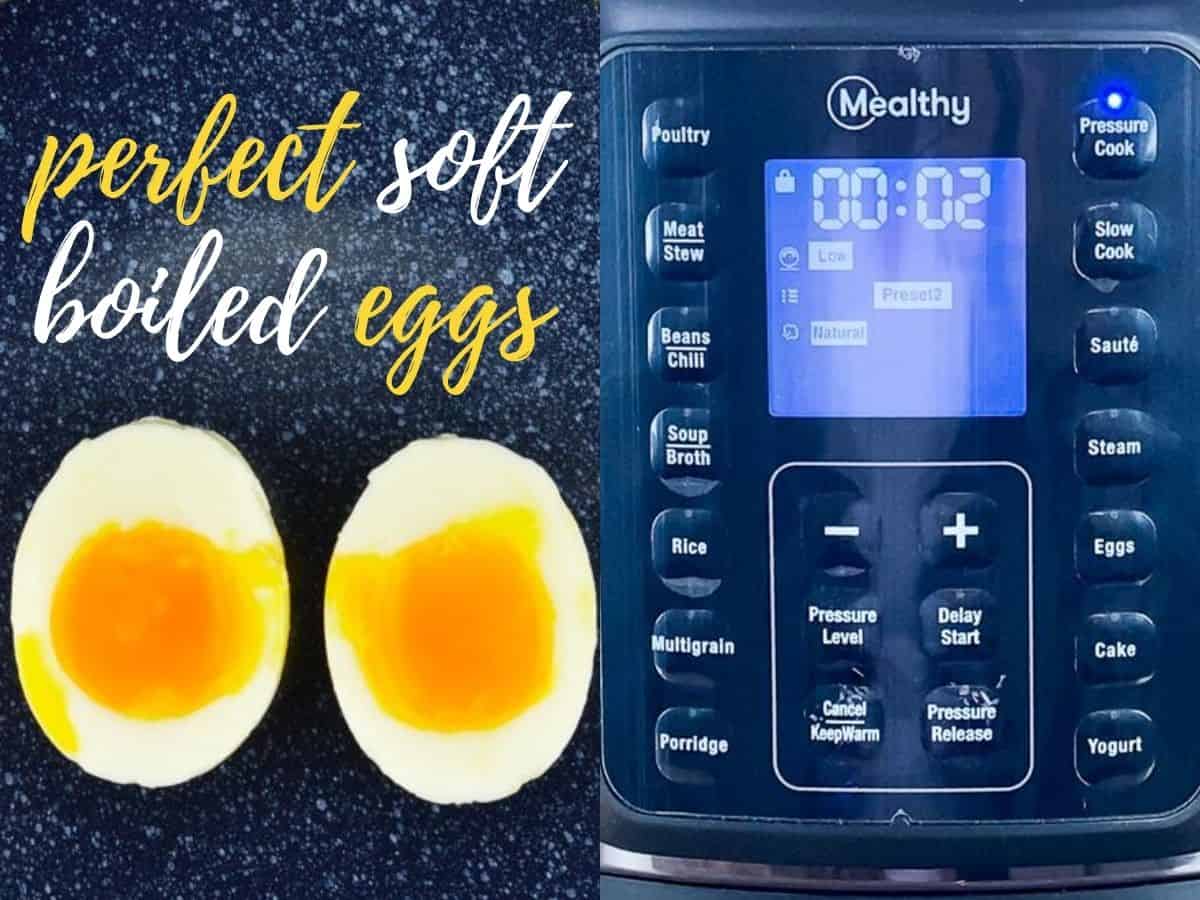
- Then press the pressure cook button, select pressure level high, time to be 5 minutes, and pressure release style to be natural.
- The Multipot will preheat for a few minutes, after which the 5 minute cooking cycle will begin.
- Once the cooking cycle is complete, wait for 5 minutes before manually releasing all the pressure from the pot, and open the lid.
- Then remove the eggs from the pot, and transfer them directly to an ice-bath for 5 minutes. This is important to stop the cooking process, and not have overcooked boiled eggs.
- Once the eggs have cooled down, start peeling them.
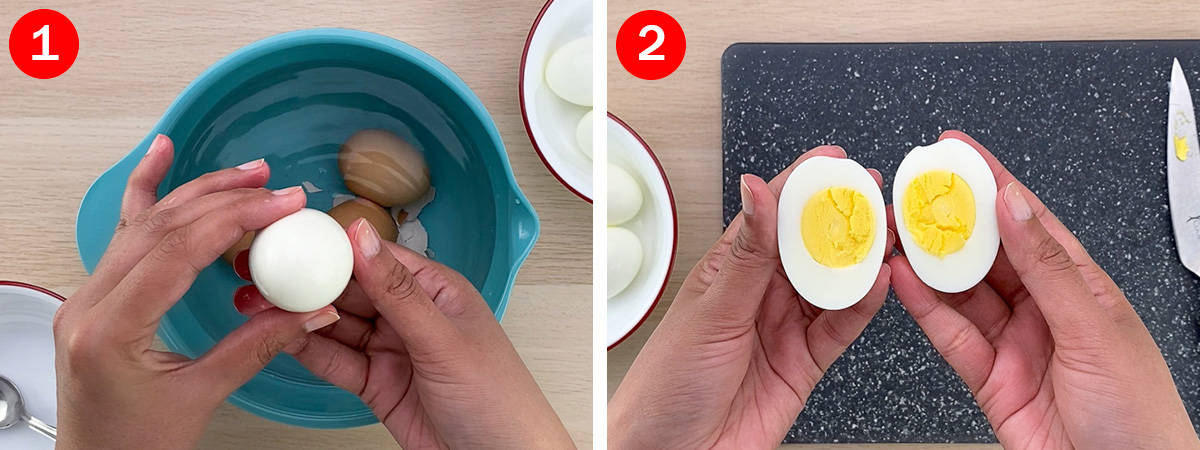
- Perfect, easy peel hard boiled eggs are ready.
- Cut & serve them as is, by sprinkling on a little salt and pepper on them, or use them in other dishes like Egg Biryani or Anda Curry.
Video Recipe
Pressure Cooker Hard Boiled Eggs FAQ
To an extent, this depends on the size of your electric pressure cooker. But you can pressure cook up to 12 eggs at a time in the 6 quart Mealthy Multipot. If you need more than 12 eggs, it's best to start another batch.
YES! You can stack the eggs one over the other and they'll be completely fine. Alternatively, you can also use an egg stacker like this one.
A cup and half of water is more than enough for hard boiling anywhere from 4-12 eggs.
How to Store Hard Boiled Eggs
Hard boiled eggs can be stored in the refrigerator for up to a week. And you can store them peeled or unpeeled, and either way, they'll stay good.
However, avoid keeping them on the counter at room temperature for a long time before refrigerating them.
Indian Recipes Using Hard Boiled Eggs:
Delicious Egg Biryani
Spicy Anda Curry
Boiled Egg Bhurji
Popular Mealthy Multipot Posts on the Blog:
Mealthy Multipot 2.0 - Review + Detailed Overview
How to Do The Mealthy Multipot Water Test
As always, I hope you found this recipe useful. If you did, please let me know your rating ⭐️ and feedback ? in the comments below, or simply rate the recipe right on the recipe card. I'd really appreciate it. ❤️
Mealthy Multipot Hard Boiled Eggs
Equipment
Ingredients
- 6 large brown eggs
- 1.5 cup water
Instructions
- Plug in your Multipot, and pour 1.5 cups of cold water in the steel inner pot.
- Place the trivet in the pot, and place the eggs on top of the trivet.
- Then close the lid, and ensure the Multipot is in sealing mode (if you don't have an auto sealing lid, and have to do it manually).
- Pressure cook on HIGH for 5 minutes, and select the pressure release mode to be - natural.
- Once the pressure cooking time is up, let the pressure release naturally for 5 minutes, and then manually release all the pressure from the pot by pressing the pressure release button.
- Remove the eggs from the pot, and place them directly in an ice bath, and let them sit in the ice bath for 5 minutes.
- Once the 5 minutes are up, start peeling the eggs.
- Perfect, easy peel hard boiled eggs are ready.
- Season with salt and chilli powder or pepper powder & serve as is, or use these eggs as an ingredient for other dishes.
Notes
- This is not absolutely essential, but it's best to use 1.5 cups of really COLD water. Because the quantity and temperature of water will determine how much time the Multipot takes to come to pressure. And this time is used to cook the eggs.
- This recipe uses 6 eggs, but you can follow the same exact timings (and use the same quantity of water) if you are hard boiling anywhere from 4-12 eggs. Though if you are using more than 6 eggs, you might need to stack them up one over the other, which is totally fine. Or just use an egg stacker like this one to make stacking eggs totally hassle free. If you need to boil more than 12 eggs at a time, it's best to start another batch.
Please note: The nutrition values are best estimates provided as a courtesy. The exact values can vary depending on the exact ingredients or brands used. If you rely on them for your specific diet and/or health issues, please consult a registered dietician or nutritionist.
Nutrition
Video Recipe
If you'd like FREE recipes and meal prep ideas delivered directly to your email inbox every Friday in one short email, then subscribe to the Foodie Friday list HERE, and never run out of ideas on what to cook over the weekend or prep for the week ahead. 🙂

Shalzmojo says
Oh my - look at technology that we can pressure boil eggs now. I have yet to experiment with this gadget though my friends have it and I did get to experience some cooking in this when I had visited them in the hills!
The Love of Spice says
Yeah electric pressure cookers are pretty handy. You should definitely try it!