


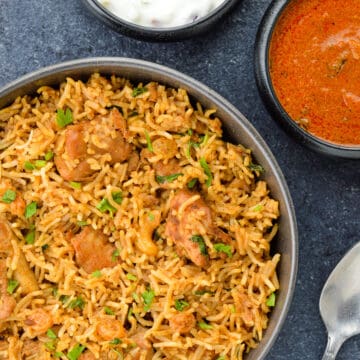
Instant Pot Chicken Biryani is hands down one of the easiest ways of making Chicken Biryani. Easy enough for even beginners (especially if you follow this step by step visual guide), pretty fail-proof, and is a One Pot Biryani in the true sense of the term. Try this Instant Pot recipe for Chicken Biryani, pair it with your favorite raita, and enjoy!
Chicken Biryani is a dish that needs no introduction. This rich and layered, chicken & rice delight is the star item of most (if not every) Indian restaurant that serves it. And for good reason.
But if you’ve tried to make biryani at home the traditional way, you know it can be quite the production. Which is okay every now and then, but doesn’t make it possible or practical to make and eat biryani every single week. Which is the dream, right?
However, this is exactly the problem that Instant Pot Chicken Biryani solves. Because with the Instant Pot, you can definitely make biryani every single weekend, and even on a weekday, if you so wish! That too with hassle free perfection!
Don’t trust me? Try this recipe for making Chicken Biryani in the Instant Pot, and I assure you, you’d never want to make Biryani any other way! 🙂
I say this because I have tried making Chicken Biryani the traditional way (on stovetop, using pressure cooker, and even dum biryani) many many times with varying degrees of success. And with that I mean that while most of those attempts tasted good - more often than not, they did not remotely look or taste like biryani.
Also, I never got that layered cooking of rice to varying degrees of done-ness right. So many instructions called for cooking the top layer of rice till 70% done, then the next layer 80%, and so on. Which is something I only got right by accident, if at all. Nothing I could rely on.
Which is why I fell in love with making Chicken Biryani in the Instant Pot. The only thing I love more than the hassle free perfection it offers, is that it is truly a one pot Biryani!
Fragrant long grain rice, cooked to perfection, along with juicy pieces of chicken, marinated & roasted in the biryani masalas, and topped with fried onions, herbs & nuts - and all in one pot - The Instant Pot. I mean how much better can life get?
But first, for the uninitiated..
Jump to:
- What is Biryani?
- The Different Kinds of Biryani
- Ingredients to Marinate Chicken for Biryani
- Marinating Chicken for Biryani
- Other Ingredients to Make Chicken Biryani
- Prepping Rice for Biryani
- Instant Pot Chicken Biryani - Step by Step
- Pro Tips for Making Chicken Biryani
- Mistakes to Avoid while Making Chicken Biryani in the Instant Pot
- Recipe Variations
- Bone-in vs Boneless Chicken Biryani
- Pressure Cooker Chicken Biryani
- What to Serve with Chicken Biryani
- More Instant Pot Recipes
- Instant Pot Chicken Biryani Recipe
What is Biryani?
Biryani is a rich, fragrant and flavorful, layered Indian rice dish, which is usually made by using long grain basmati rice, and some kind of meat as the base, and flavoring them with fried onions, biryani spices, herbs and nuts.
However, with time, this dish has evolved, and is made in many vegetarian varieties as well.
The Different Kinds of Biryani
There are many different kinds of biryani, more than I could possibly list out here. And even if I try, I am sure to miss out some.
But mostly Biryanis are named after the region they are originally from or the ingredients they use.
Like
Hyderabadi Biryani, Lucknowi Biryani , Malabari Biryani, Kolkatta Biryani
Or
Chicken Biryani, Prawns Biryani, Egg Biryani, Paneer Biryani, Mixed Vegetable Biryani.. you get the idea.
Sometimes, they are named after the cooking methods used - for instance kacchi biryani (made using raw meat and uncooked rice to begin with), pakki biryani (made using partially cooked meat and rice as the starting point), and dum biryani (which involves slow cooking the biryani in a heavy bottomed pot, and sealing the opening of the pot with raw dough, so as to not let the steam or the flavors escape).
Of-course Chicken Biryani is my absolute favorite of the lot, which is why it’s the recipe I am sharing first. And Instant Pot is now my new favorite way to make Chicken Biryani. Which is why I hope you'll try this Instant Pot Chicken Biryani recipe, because I know you'll love it too!
Here's the step by step recipe to make chicken biryani in the Instant pot..
Ingredients to Marinate Chicken for Biryani

Ingredient notes
If you are using boneless chicken, always use thigh meat, as breast meat is not suitable for pressure cooking, because it's easy to overcook, and will turn rubbery.
It's also best to cut the boneless meat into relatively bigger cubes for biryani, especially when pressure cooking it.
Marinating Chicken for Biryani
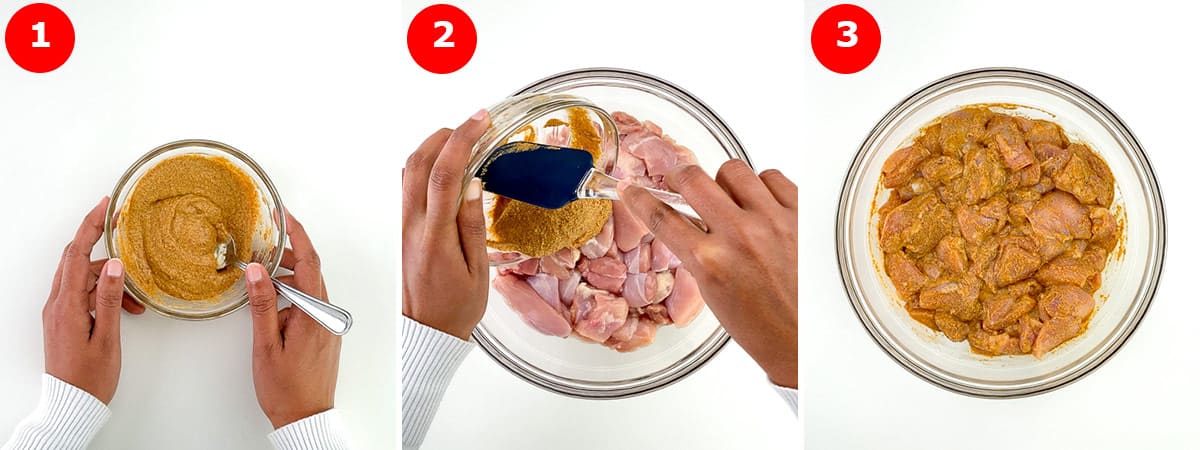
- Take 2½ pounds of boneless chicken thighs, cleaned and cut into big bite sized pieces.
- In a bowl, mix together 4 tablespoon yogurt, 3 tablespoon ginger garlic paste, 2 teaspoon salt, 2 teaspoon red chilli powder, 2 teaspoon garam masala powder, 2 teaspoon coriander powder, and 1 teaspoon cumin powder, to make a marinade.
- Apply the marinade to the chicken pieces, ensuring to coat them well.
- Refrigerate the marinated chicken for 4-6 hours. It's ideal to marinate the chicken the night before you want to make the biryani, but in a pinch, an hour of marination will also be enough.
Other Ingredients to Make Chicken Biryani
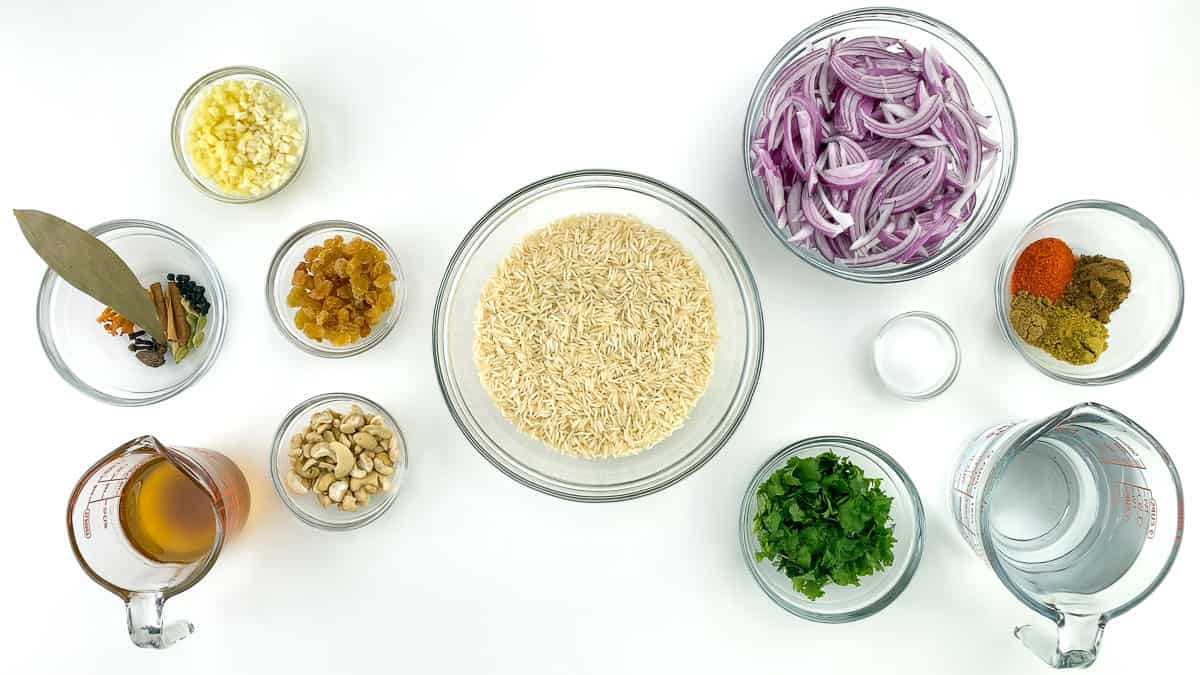
Ingredient notes
Long Grain Basmati Rice is best suited for making biryani. I swear by this brand of rice - India Gate White Basmati - Excel.
For this recipe, I have only used fresh coriander leaves to garnish and flavor it, but mint leaves make for a great addition too!
In the same way, you can always flavor with additional nuts of your choice, and saffron and kewra water too!
Prepping Rice for Biryani
- Take 2 cups of basmati rice, wash and rinse it well, and soak it in fresh water for 30 minutes.
- When done, strain all the water away.

Instant Pot Chicken Biryani - Step by Step
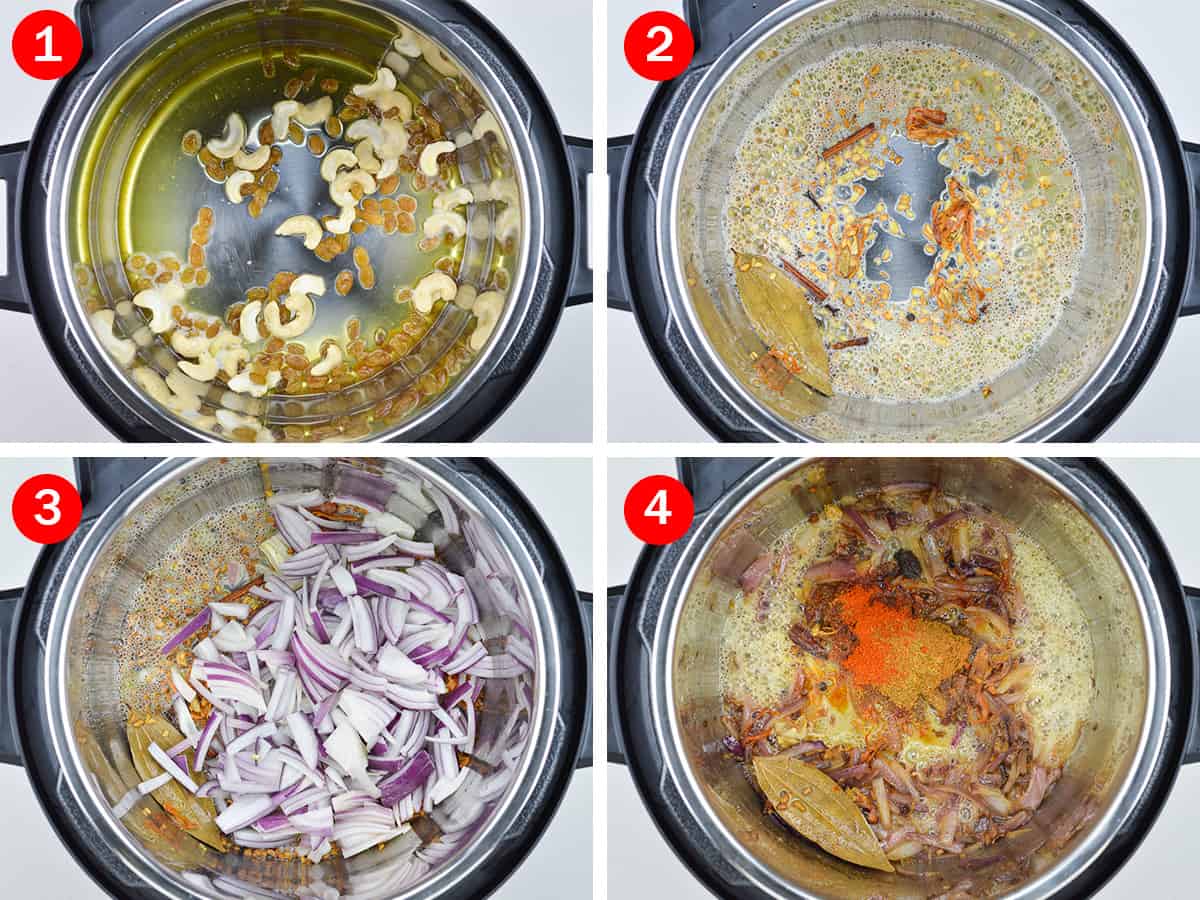
- Start Instant Pot in saute mode, add ½ cup ghee, and lightly heat it up, for about 2 minutes.
- Then first add in ¼ cup cashews, and lightly roast it for 1-2 minutes, to give it a head start, before adding in ¼ cup golden raisins, and lightly roast it for 1-2 minutes, till the cashews start to change color, and the raisins start balloon-ing up a bit.
- When done, take out the roasted cashews and raisins, using a slotted spoon (to strain off excess ghee).
- Now start with adding in the whole spices all together ( 1 big bay leaf, 2 inch cinnamon sticks, 20 black peppercorns, 7 green cardamom, 1 black cardamom, 5 cloves, and 1 mace), and lightly roast it for a minute or so, till they give off a light aroma.
- Then add in 2 tablespoon chopped ginger and 2 tablespoon chopped garlic together, and lightly roast it for 1-2 minutes, till they start changing color.
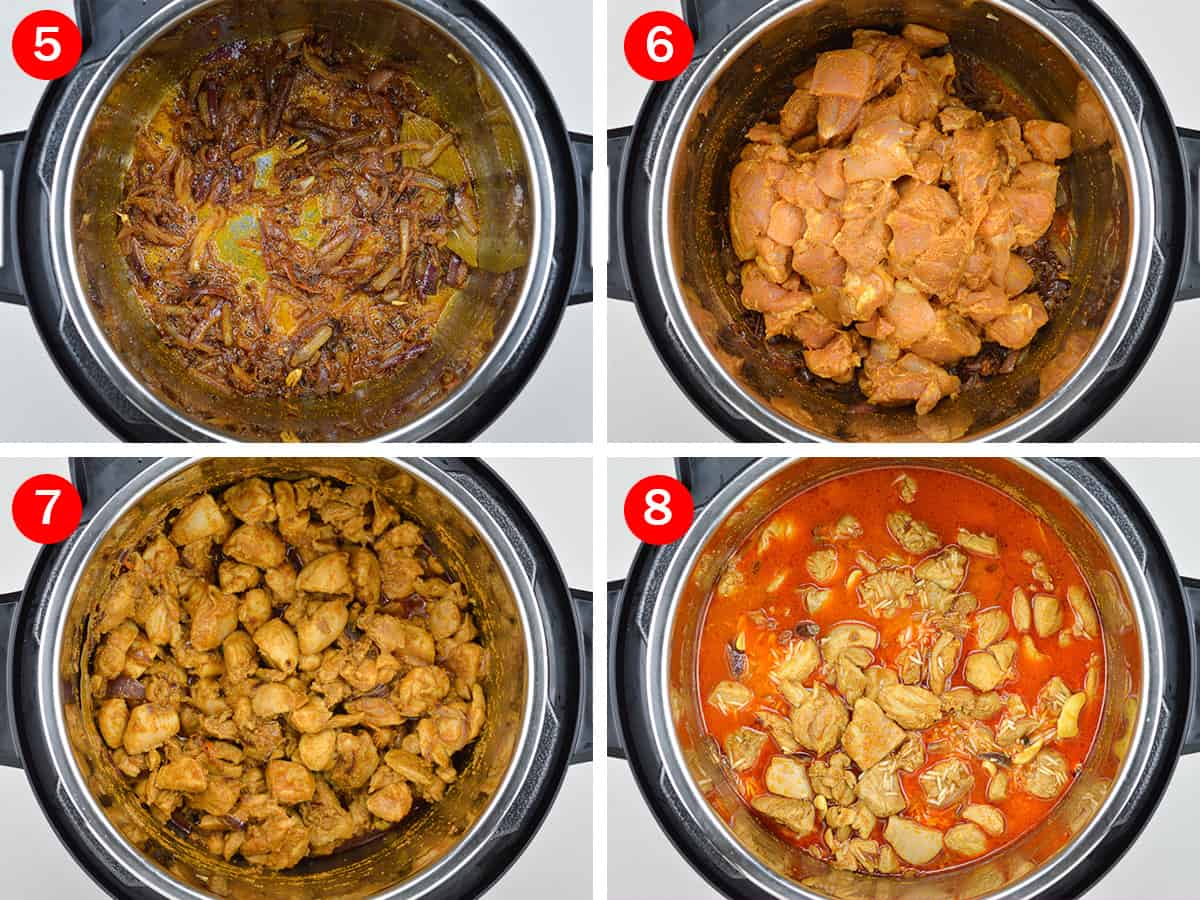
- When done, add in 3 cups sliced onions and 1¼ teaspoon salt, and saute till the onions turn golden brown in color. It's best to switch the saute mode to high from normal for roasting onions, to cut down on the time it takes to roast the onions.
- But even on high, it might take about 15 minutes to roast them well. Here also ensure to keep moving the onions around every few minutes, to ensure they don't burn as they are roasted on high heat.
- Once the onions are done, switch back to saute mode normal, and add in the spice powders all together (2 teaspoon red chilli powder, 2 teaspoon garam masala powder, 2 teaspoon coriander powder, and 1 teaspoon cumin powder), and lightly roast them for 2-3 minutes.
- Here it's best to add a splash of water (2-4 tablespoons) to ensure the masalas don't burn due to high heat, and also adding water will help scrape off anything sticking to the bottom of the pot.
- Then add in the marinated chicken, mix it in, and saute for 5-8 minutes, till the chicken is lightly cooked, and not pink on the outside anymore. Then turn off the saute mode.
- Now first add in 2 cups of water and 2 teaspoon salt, and mix it in.
- Then add in the soaked and strained basmati rice, and mix it in, and here ensure to press all the rice under the water.
- At this point, you can also add in half of the roasted raisins and cashews that were kept aside earlier. The other half can be used for garnish at the end.
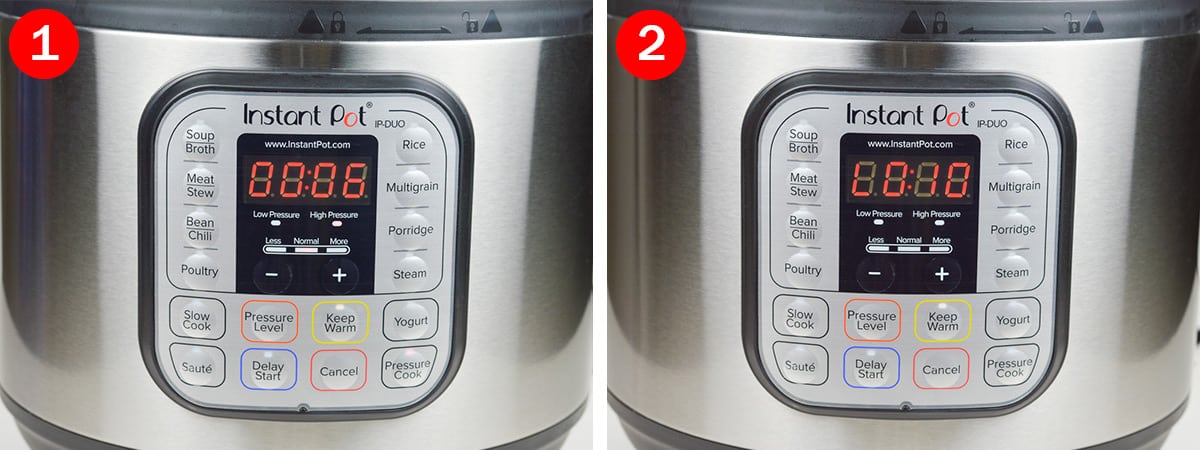
- Now close the Instant Pot lid, and ensure it is on sealing.
- Pressure cook for 6 minutes on high.
- When the cooking cycle is complete, let the pressure release normally for 10 minutes, then manually release all the pressure from the pot, and open the lid.
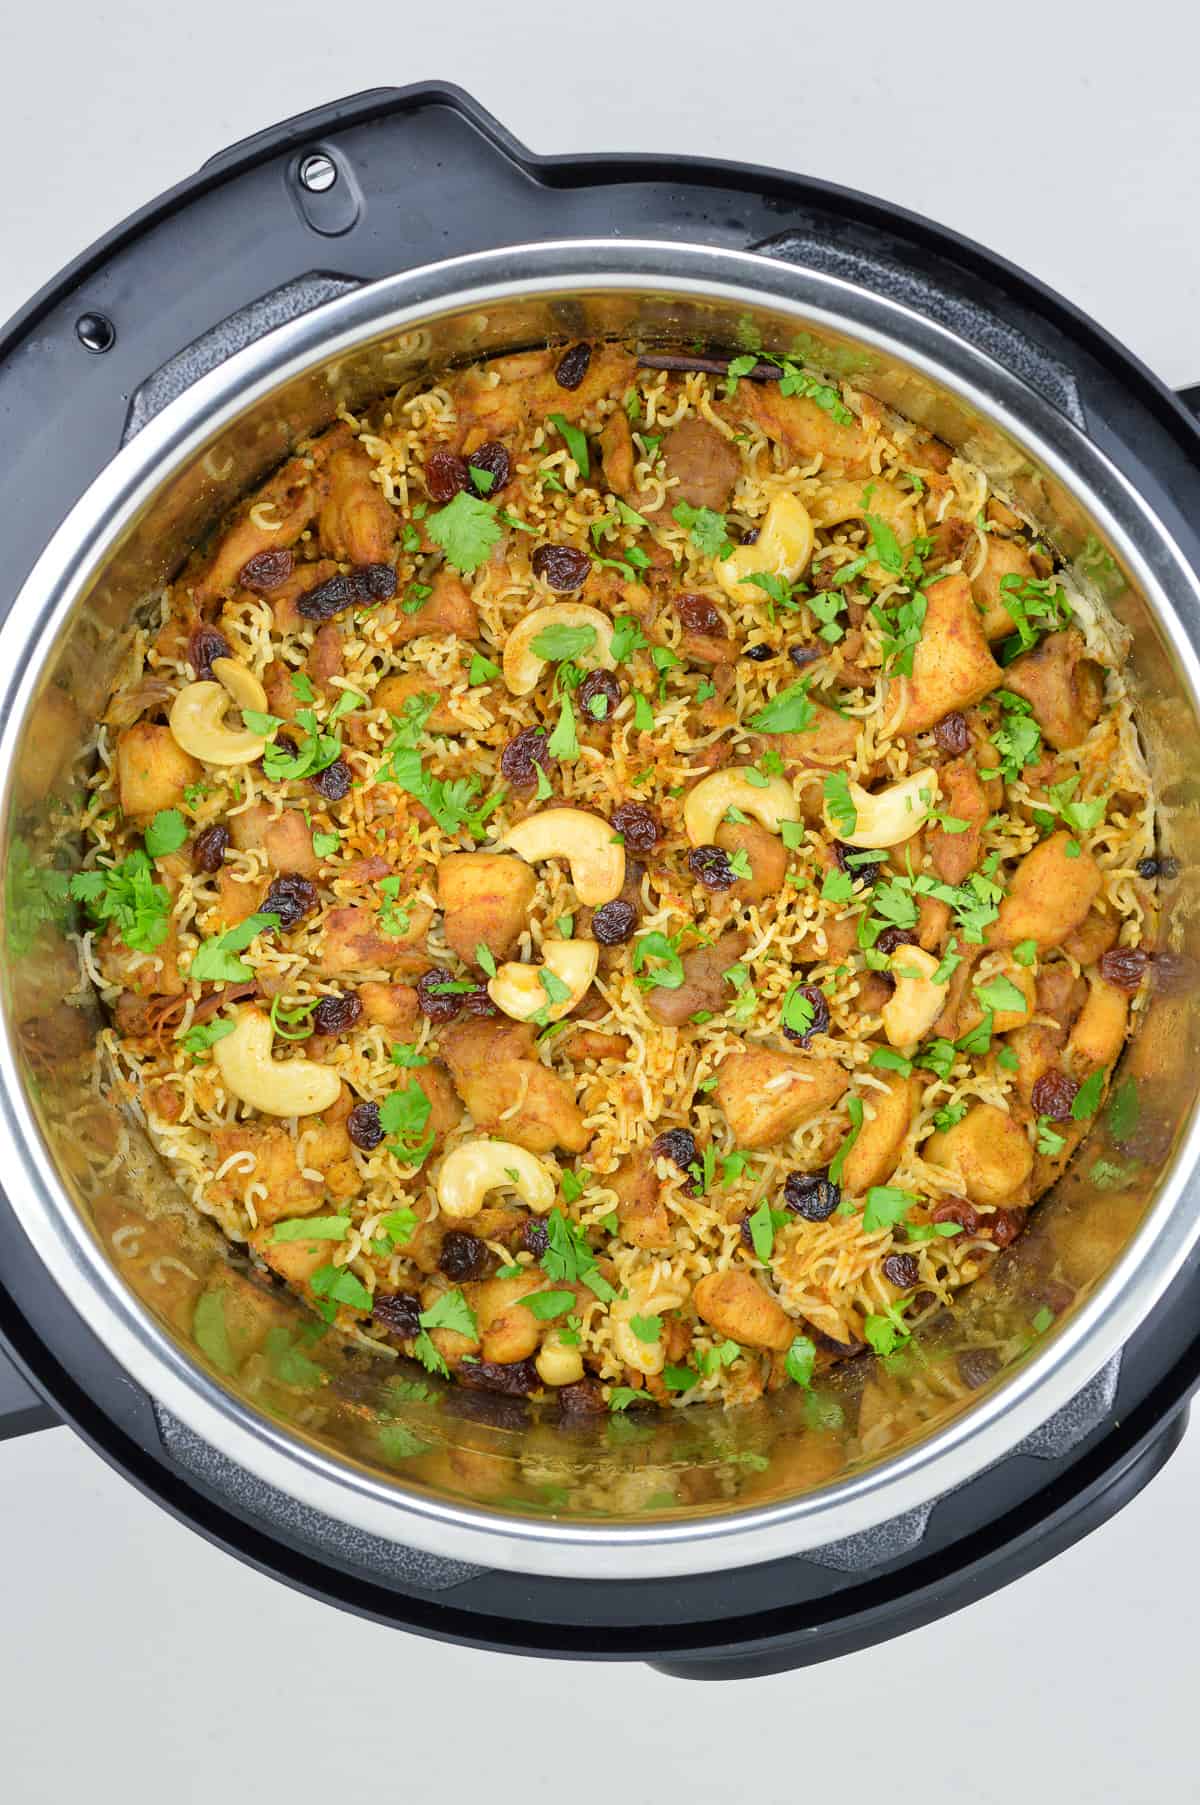
- At this point you can add in the freshly chopped coriander ( ½ cup), and the rest of the roasted cashews and raisins.
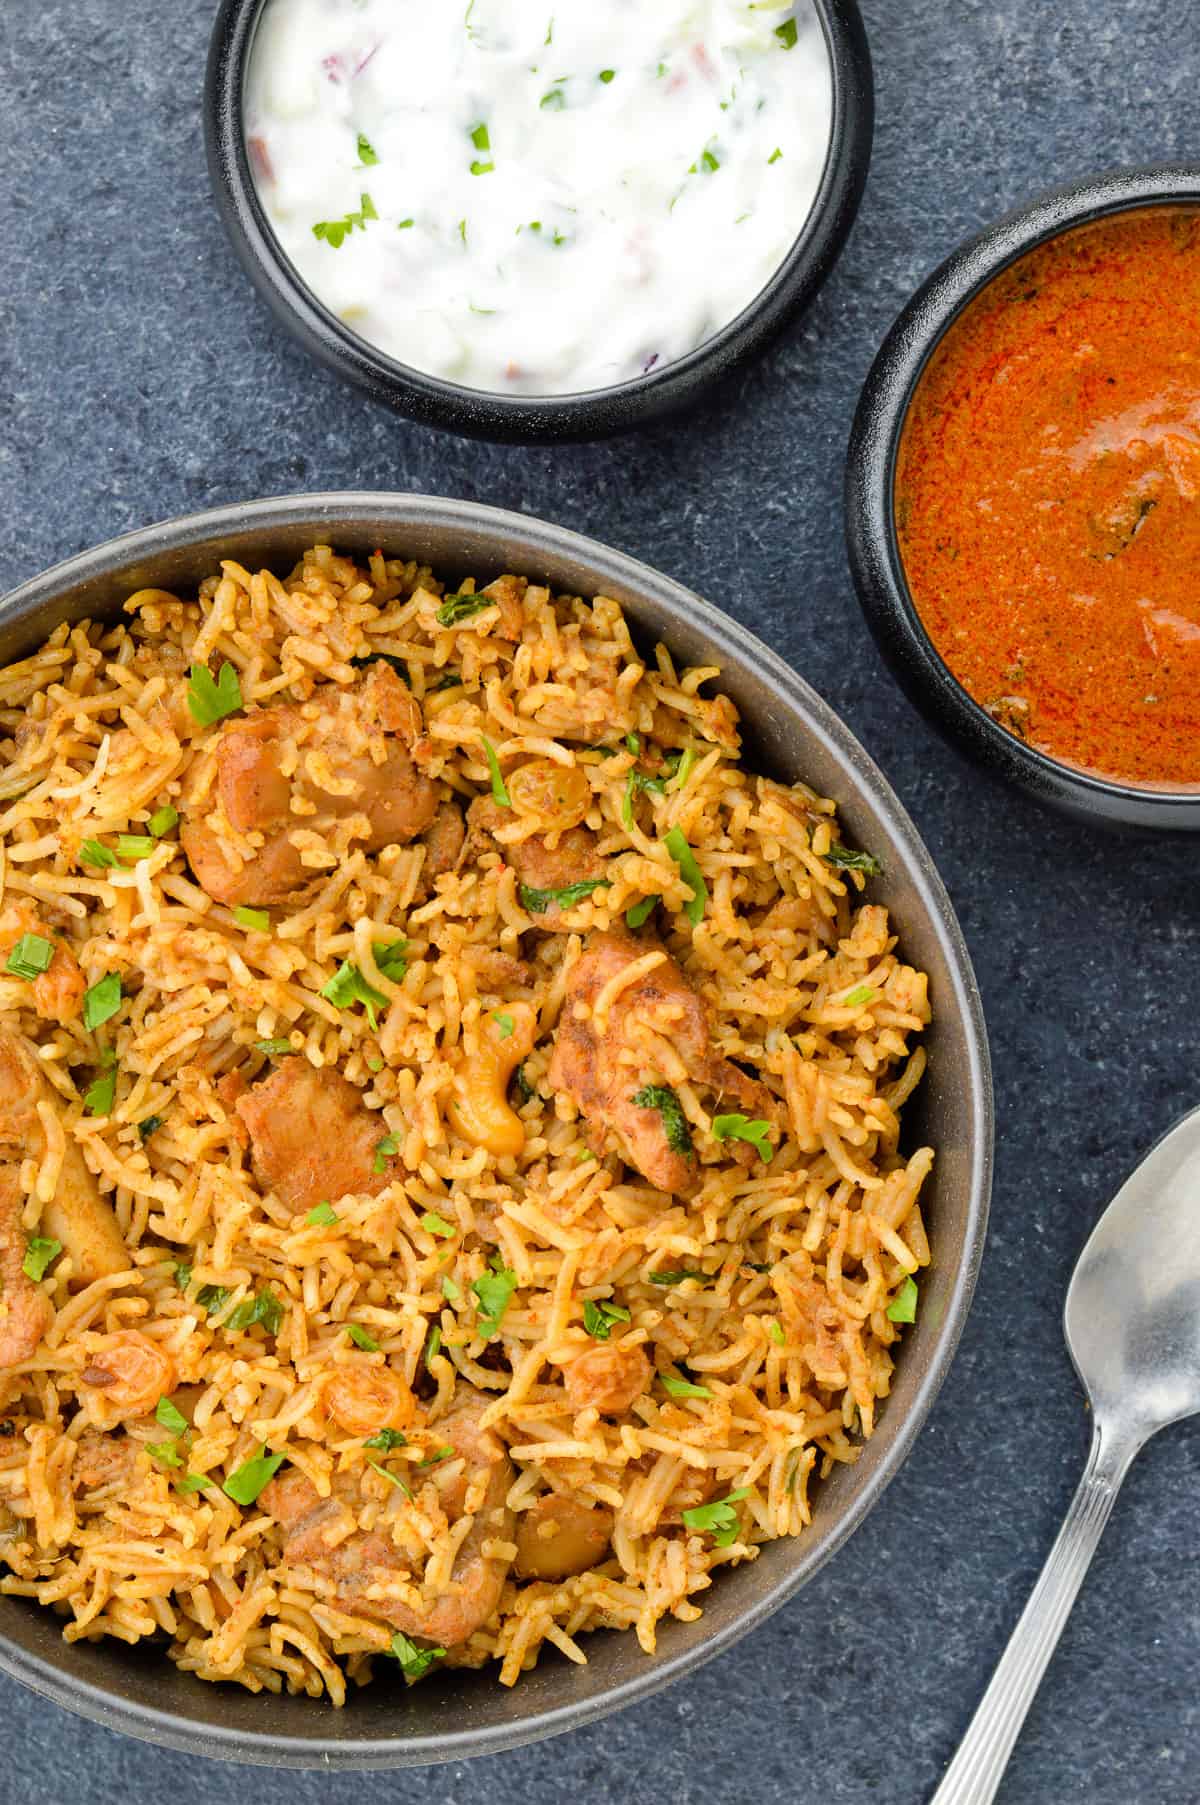
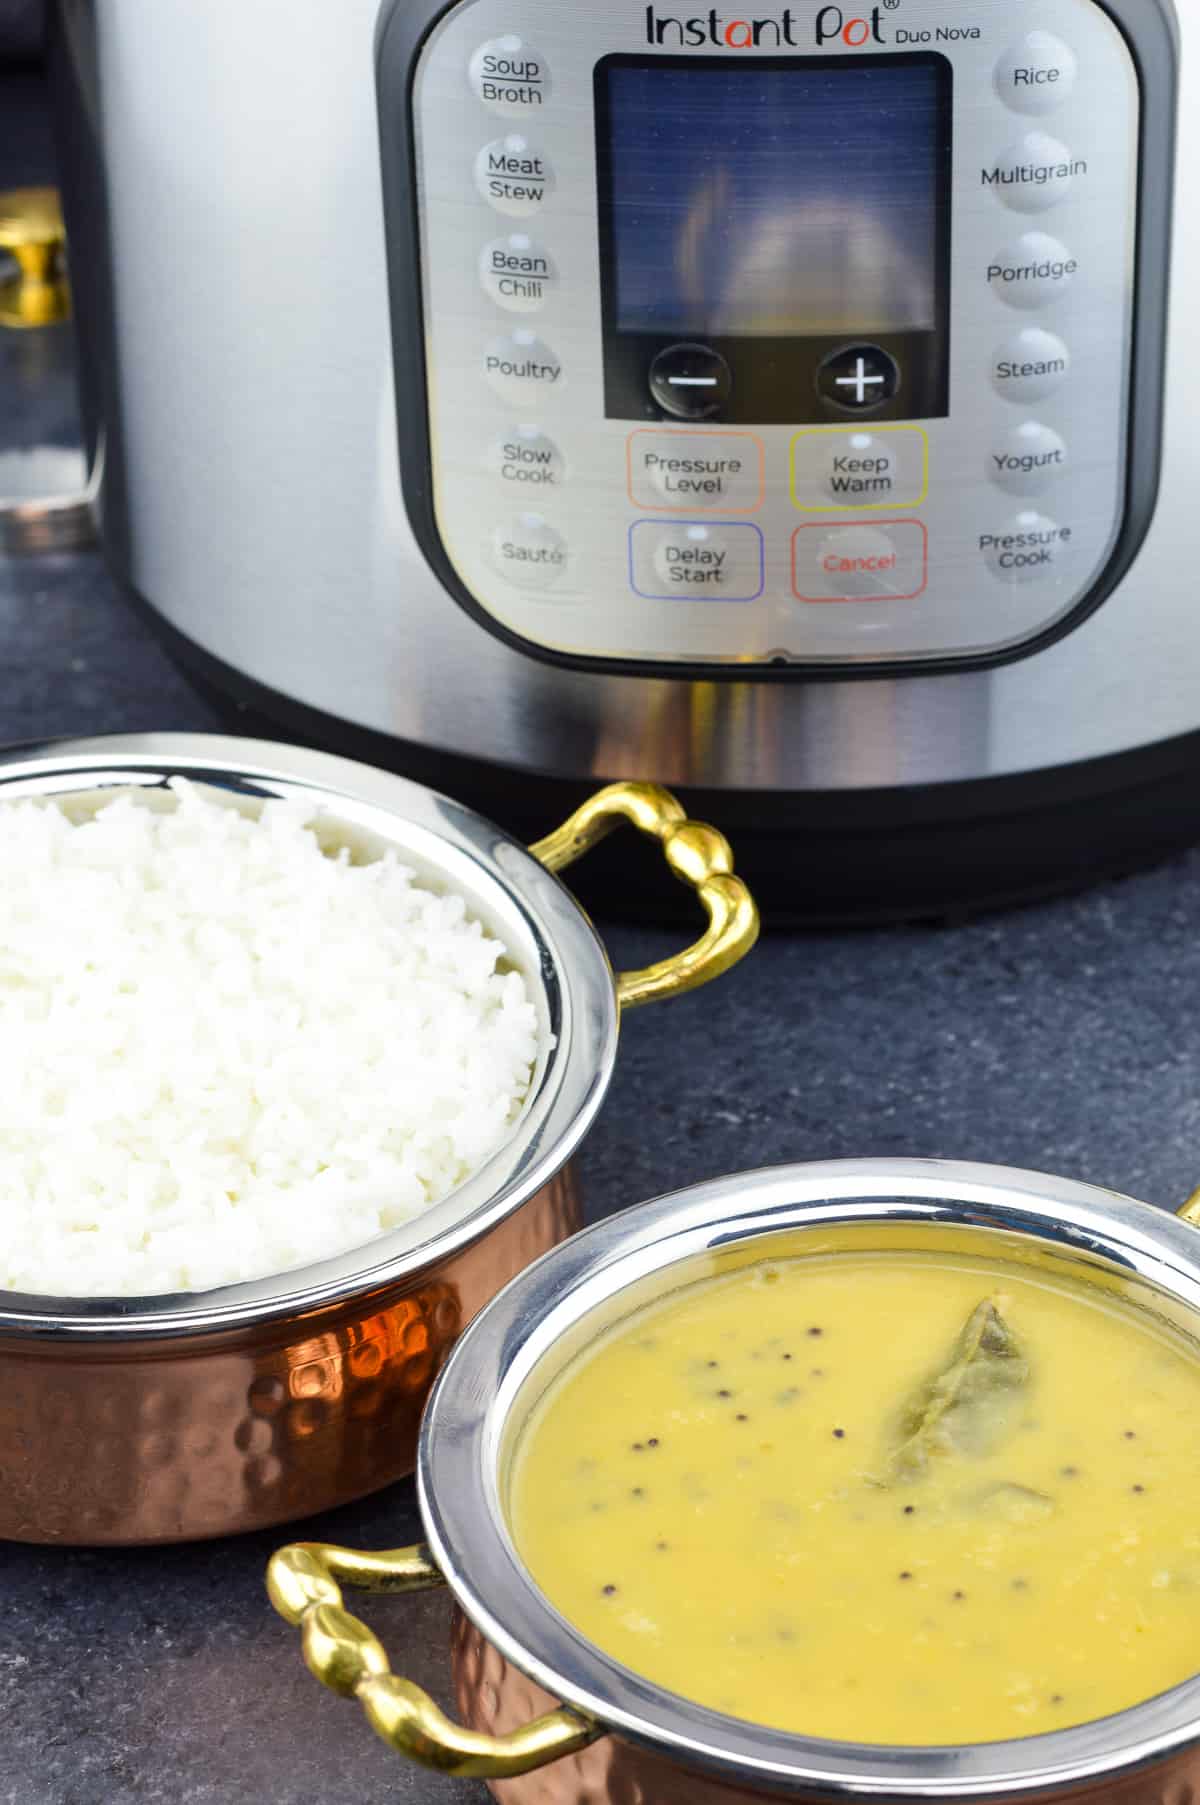
Instant Pot Chicken Biryani is ready to serve!
Pro Tips for Making Chicken Biryani
There are many factors that contribute to making a good chicken biryani, but the key elements are obviously chicken and rice - it’s critical to get them right.
- Use long grain basmati rice over regular rice. And ensure to wash and soak it for 30 minutes and drain completely.
- Use chicken thigh meat instead of chicken breast meat if you are making boneless chicken biryani, as breast meat is easy to over-cook, and might turn rubbery after pressure cooking. For bone-in chicken biryani, you can use either chicken drumsticks or chicken leg quarters.
Mistakes to Avoid while Making Chicken Biryani in the Instant Pot
If you are making biryani the traditional way, there are a hundred (?!) things that can go wrong! Though when you are making biryani in the Instant Pot, there is a much smaller margin for error.
But be that as it may, here are two mistakes you must avoid for making perfectly cooked chicken biryani in the Instant Pot -
- Not cooking chicken even a little bit before pressure cooking it. Because depending on the quantity and size of the chicken pieces, it might not get cooked fully in the pressure cooking cycle.
Taking the time to cook the chicken for a few minutes before pressure cooking the biryani, will ensure that the chicken is cooked well, when the biryani is ready. - Not pushing the rice under the water before closing the lid, and pressure cooking the biryani.
Some videos show a dump & go style biryani, which look simple on video. But taking the extra 2 seconds to push all the rice down, will ensure the biryani rice is evenly and perfectly cooked.
Recipe Variations
Sharing 2 recipe variations that I have tried - for those who either want to use bone-in chicken for making biryani instead of the boneless chicken used in the recipe, and for those who don't have the Instant Pot, and want to make chicken biryani in regular pressure cooker.
Bone-in vs Boneless Chicken Biryani
If you are using bone-in chicken for biryani..
- You can follow the same steps as listed above for making bone-in chicken biryani as well in the Instant Pot, usually with one adjustment - increasing the saute time of chicken based on the size of the chicken pieces, to ensure the chicken is fully cooked through when the biryani is ready.
- I often use 3 pounds of chicken leg quarters, instead of boneless chicken, keeping everything else the same, and I usually need to saute it for 10-15 minutes, before pressure cooking it.
Pressure Cooker Chicken Biryani
If you don't have the Instant Pot, you can make chicken biryani in the trusty old Indian pressure cooker as well..
- You can follow the same steps as listed above for making chicken biryani in the Indian pressure cooker, with 2 adjustments. 1. Soak the rice for 1 hour instead of 30 minutes. 2. Position the chicken at the bottom & rice at the top, as much as possible.
- Then pressure cook for 1 whistle, and turn off the gas, and wait for the pressure to release naturally.
- If the rice is undercooked, after the first whistle, place the pressure cooker on a cast iron pan, and heat it on medium low heat for 10 mins. This will ensure the rice gets cooked without burning the bottom layer.
What to Serve with Chicken Biryani
A biryani is considered a full meal in itself, since it has rice, meat, and veggies too. But still, pairing it with raita, makes an already perfect dish complete. Because biryani and raita are a match made in culinary heaven!
So pair this chicken biryani with your favorite kind of raita - cucumber raita, onion raita, mint raita, all go very well with it.
You may also like this Restaurant Style Chicken 65 or Chicken Kali Mirch as a side.
More Instant Pot Recipes
⭐ Instant Pot Ghee - Handsfree Ghee in 10 Minutes
⭐ How to Cook Dal & Rice Together in Instant Pot
⭐ Instant Pot Palak Paneer - One Pot Palak Paneer
⭐ How to Make Perfect Hard Boiled Eggs in Instant Pot
⭐ Instant Pot Bhuna Masala - Indian Curry Sauce Base
As always, I hope you found this recipe useful. If you did, please let me know your rating ⭐️ and feedback ? in the comments below, or simply rate the recipe right on the recipe card. I'd really appreciate it. ❤️
Instant Pot Chicken Biryani Recipe
Equipment
Ingredients
For Chicken Marination
- 2½ pounds boneless chicken (thighs)
- 4 tablespoon yogurt
- 3 tablespoon ginger garlic paste
- 2 teaspoon salt
- 2 teaspoon red chilli powder
- 2 teaspoon garam masala powder
- 2 teaspoon coriander powder
- 1 teaspoon cumin powder
For Biryani Masala
- ½ cup ghee
- ¼ cup cashews slit
- ¼ cup golden raisins
- 1 big bay leaf
- 2 inch piece cinnamon stick
- 20 black peppercorns
- 7 green cardamom
- 1 black cardamom
- 5 cloves
- 1 mace (javetri)
- 2 tablespoon chopped ginger
- 2 tablespoon chopped garlic
- 3 cup sliced onions
- 3¼ teaspoon salt divided
- 2 teaspoon red chilli powder
- 2 teaspoon garam masala powder
- 2 teaspoon coriander powder
- 1 teaspoon cumin powder
- 2 cup basmati rice
- 2 cup water
- ½-¾ cup chopped coriander leaves or other herbs like mint
Instructions
Marinating Chicken for Biryani
- Take 2½ pounds of boneless chicken thighs, clean and then cut them into big bite sized pieces.
- In a bowl, mix together 4 tablespoon yogurt, 3 tablespoon ginger garlic paste, 2 teaspoon salt, 2 teaspoon red chilli powder, 2 teaspoon garam masala powder, 2 teaspoon coriander powder, and 1 teaspoon cumin powder, to make a marinade.
- Apply the marinade to the chicken pieces, ensuring to coat them well.
- Refrigerate the marinated chicken for 4-6 hours. It's ideal to marinate the chicken the night before you want to make the biryani, but in a pinch, an hour of marination will also be enough.
Preparation for Chicken Biryani
- Take 2 cups of basmati rice, wash & rinse it well, and soak it fresh water for 30 minutes. When done, strain all the water away.
- If you have refrigerated the chicken, ensure to take it out of the fridge to thaw at room temperature at-least 20-30 minutes before cooking it.
Making Chicken Biryani in Instant Pot
- Start Instant Pot in saute mode, add ½ cup ghee, and lightly heat it up, for about 2 minutes.
- Then first add in ¼ cup cashews, and lightly roast it for 1-2 minutes, to give it a head start, before adding in ¼ cup golden raisins, and lightly roast it for 1-2 minutes, till the cashews start to change color, and the raisins start balloon-ing up a bit.
- When done, take out the roasted cashews and raisins, using a slotted spoon (to strain off excess ghee).
- Now start with adding in the whole spices all together ( 1 big bay leaf, 2 inch cinnamon sticks, 20 black peppercorns, 7 green cardamom, 1 black cardamom, 5 cloves, and 1 mace), and lightly roast it for a minute or so, till they give off a light aroma.
- Then add in 2 tablespoon chopped ginger and 2 tablespoon chopped garlic together, and lightly roast it for 1-2 minutes, till they start changing color.
- When done, add in 3 cups sliced onions and 1¼ teaspoon salt, and saute till the onions turn golden brown in color. It's best to switch the saute mode to high from normal for roasting onions, to cut down on the time it takes to roast the onions. But even on high, it might take about 15 minutes to roast them well. Here also ensure to keep moving the onions around every few minutes, to ensure they don't burn as they are roasted on high heat.
- Once the onions are done, switch back to saute mode normal, and add in the spice powders all together (2 teaspoon red chilli powder, 2 teaspoon garam masala powder, 2 teaspoon coriander powder, and 1 teaspoon cumin powder), and lightly roast them for 2-3 minutes. Here it's best to add a splash of water (2-4 tablespoons) to ensure the masalas don't burn due to high heat, and also adding water will help scrape off anything sticking to the bottom of the pot.
- Then add in the marinated chicken, mix it in, and saute for 5-8 minutes, till the chicken is lightly cooked, and not pink on the outside anymore. Then turn off the saute mode.
- Now first add in 2 cups of water and 2 teaspoon salt, and mix it in.
- Then add in the soaked and strained basmati rice, and mix it in, and here ensure to press all the rice under the water.
- At this point, you can also add in half of the roasted raisins and cashews that were kept aside earlier. The other half can be used for garnish at the end.
- Now close the Instant Pot lid, and ensure it is on sealing.
- Pressure cook for 6 minutes on high. When the cooking cycle is complete, let the pressure release normally for 10 minutes, then manually release all the pressure from the pot, and open the lid.
- At this point you can add in the freshly chopped coriander ( ½ cup), and the rest of the roasted cashews and raisins.
- Instant Pot Chicken Biryani is ready to serve.
VARIATIONS
Using Bone-In Chicken
- You can follow the same steps as listed above for making bone-in chicken biryani as well in the Instant Pot, usually with one adjustment - increasing the saute time of chicken based on the size of the chicken pieces, to ensure the chicken is fully cooked through when the biryani is ready.
- I often use 3 pounds of chicken leg quarters, instead of boneless chicken, keeping everything else the same, and I usually need to saute it for 10-15 minutes, before pressure cooking it.
Pressure Cooker Chicken Biryani
- You can follow the same steps as listed above for making chicken biryani in the Indian pressure cooker, with 2 adjustments. 1. Soak the rice for 1 hour instead of 30 minutes. 2. Position the chicken at the bottom & rice at the top, as much as possible.
- Then pressure cook for 1 whistle, and turn off the gas, and wait for the pressure to release naturally.
- If the rice is undercooked, after the first whistle, place the pressure cooker on a cast iron pan, and heat it on medium low heat for 10 mins. This will ensure the rice gets cooked without burning the bottom layer.
Notes
- I know that the quantity of chicken I’ve used in this recipe is on the higher side, because as a family we prefer more chicken in the biryani. You can use lesser quantity of chicken, just adjust the marination masala, chicken cooking time & salt accordingly, and proceed with the rest of the steps as is.
- I have also used boneless chicken in the main recipe because my son prefers that, but you can use either boneless or bone-in chicken. If you are using boneless chicken, use chicken thighs, not breast meat, because breast meat is not that suitable for pressure cooking, as it's more likely to be over done, and turn dry and rubbery. If you are using bone-in chicken, just adjust the cooking time of the chicken, like mentioned above.
Please note: The nutrition values are best estimates provided as a courtesy. The exact values can vary depending on the exact ingredients or brands used. If you rely on them for your specific diet and/or health issues, please consult a registered dietician or nutritionist.
Nutrition
Video Recipe
This recipe was first published in May 2020, and has been republished with updated instructions, notes & tips, step images, as well as video in Jan 2022.
If you'd like FREE recipes and meal prep ideas delivered directly to your email inbox every Friday in one short email, then subscribe to the Foodie Friday list HERE, and never run out of ideas on what to cook over the weekend or prep for the week ahead. 🙂
Christy says
Used one pack of party wings and one pack of chicken breast (both from Costco) and subbed yellow onion for the red. Kept everything else about the same and wow amazing. Thank you for simplifying it so even a noobie cook (this is my first Indian dish homemade that wasn’t from a jar) and I am so proud!!! We LOVED IT!!
The Love of Spice says
So glad you all enjoyed it!
TB says
Mine burnt. Ended up having to finish the rice in the oven.
The Love of Spice says
Oh, that is really odd. Because I have never had rice burn or heard from anyone else about it burning, because it's added along with water. Did you add the correct amount of water? And cook for the specified time? Also, did you scrape the bottom as shown, after frying the onions? That can sometimes trigger a burn signal in IP, if you have not glazed the pot at that stage.
Natasha says
Lip smacking delicious!
Love the rain, cashew and coriander garnish. 🙂
Shantala's Kitchen says
Thank you so much 🙂
Damyanti says
I love dum biriyani. How close does it get in instant pot?
Shantala's Kitchen says
It can't replicate the flavor of slow cooking the dum biryani. But it comes very close.